
Creating a Fused Glass Desert Diorama, Pt. 3
The completed background layer created in Part 2 with the completed midground layer placed on top
This is the third part of a multi-stage project. Start at Part 1 if you’d like to understand the full creation of this piece from start to finish!
Building the Foreground Layer
Coordinating Greens
I kicked off this layer with test samples of various green sheet glasses and stringers to see which color combos, sizes, and placements would work best for the interesting cacti textures that I wanted to serve as the focal point of this layer.
Cacti sample setup drawn to record the glass types, sizes, and positions used in each
Whenever I perform a test sample, I take before and after photos and also draw a correlating sketch of the setup to note the exact glasses, sizing, spacing, etc. that were used.
Sometimes glasses undergo significant shifts in color and/or position during firing, and it can be surprisingly difficult to remember what was what, especially if many different types were involved. Having documentation keeps multi-stage projects moving smoothly, and also allows me to easily pick up where I left off if I have to suddenly step away from a project to work on a commission, attend a workshop, or see to some other immediate priority.
I also store all the past samples I’ve created so that they can be referenced during future projects. This way I have a quick-reference guide to consult whenever I’m picking out the color palette of a new piece.
I wanted the green-on-green combos of the cacti to contrast enough to make their texture visible at a short distance, so I used the post-firing samples to rule out color pairings that were too highly similar.
Predictably, the stringer bits overhanging the topsides of the samples shifted significantly. To use that positioning, I’d have to either:
Lengthen the stringer portions sitting on the glass
Use something to support the overhangs (e.g. fiber paper).
Cacti samples, pre-firing
Cacti samples, post-firing
Sprouting Spikes
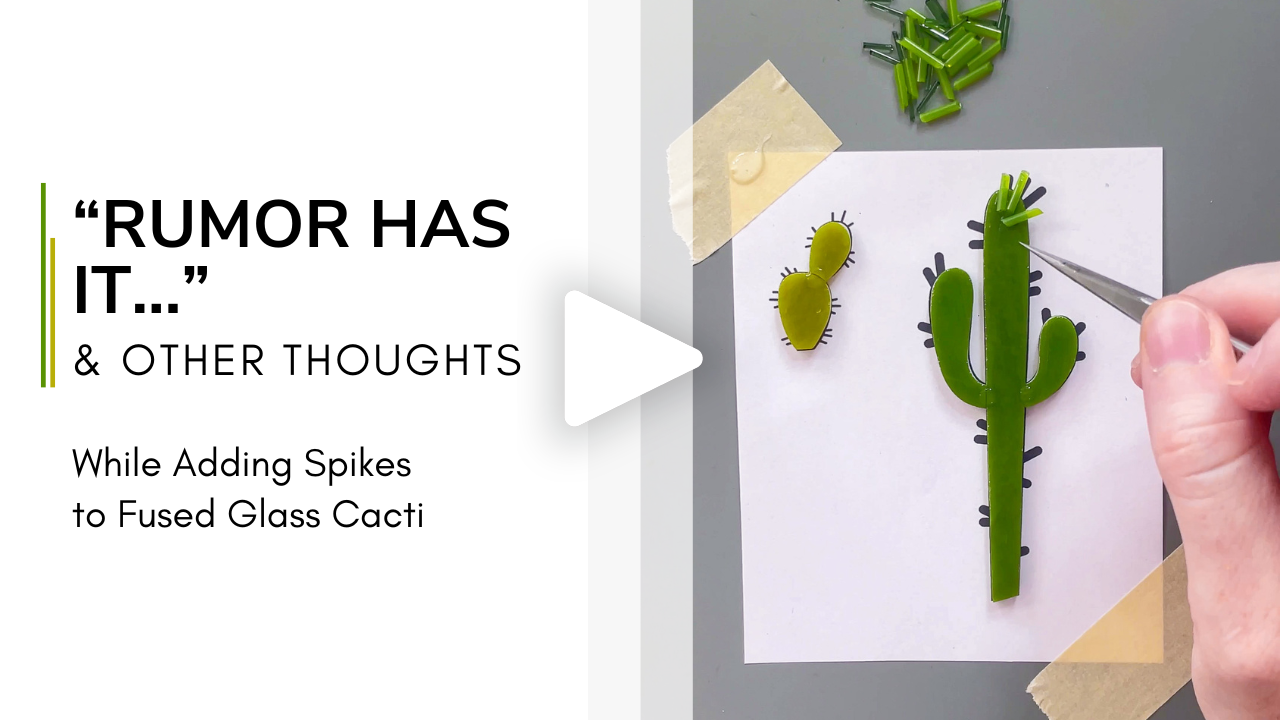
Rather than try to manipulate glue-dabbed ends of the Prickly Pear and Saguaro Cacti spikes into position while they rolled around underneath the sheet glass segments, I thought it would be easier to glue them to the cacti topsides, and then place the cacti in the kiln spike-sides-down once the glue dried.
To do this while following the exact spike placement of the pattern, I mirrored the cacti in my digital design and reprinted them to use as a template while gluing on their spikes (the fact that this took under a minute is just one of infinite reasons I’m SO glad to have transitioned away from hand-drawing patterns).
Rough glass cuts placed on top of the foreground layer pattern
The Prickly Pear and Saguaro Cacti on top of mirrored versions of their patterns, allowing spikes to be glued to their topsides
The Prickly Pear and Saguaro Cacti with spikes glued to their topsides, pre-firing
I didn’t have to mirror the pattern of the Barrel Cacti since their spikes could be glued directly to their topsides. However, I did have to find a way to position the spikes in precisely curved lines to give an illusion of curvature.
Whenever I need to arrange small bits along exact paths, I print out the pattern, cut along the path, and then gently nudge the bits into place with the pattern’s edge.
In this case, I cut along the outermost curved spike line of the Barrel Cactus pattern, and then glued the correlating spikes on to the glass surface in a rough line. While the glue was still wet, I laid the pattern on the glass and pushed the bits with its edge so they conformed to its exact curvature.
Afterward, I cut along the next line of spikes and repeated the process, continuing until all spikes were in formation.
The process of using the right edge of the large Barrel Cactus pattern to position curved lines of spikes into place
Drifting & Rejoining
Once their details were added, I tack-fused the cacti just enough to hold their bits together without softening their edges.
Even though I would later have to conduct a second firing to attach them to the land segment, I chose to perform this initial firing in case any of the cacti fused out of place. This way, I could fix or redo them individually instead of scrapping all of them along with the land mass.
Cacti setup within the kiln, pre-firing
Cacti, post-firing
Firing the cacti separately from the land turned out to be a blessing because the Saguaro arms shifted away from the vertical body segment during the fuse! This shift was likely due to the fact that I’d placed fairly large dollops of glue at the junctures where the arms abutted the body.
Though I was still liberally using glue during this project, I’ve since learned that it’s not really a fuser’s friend (no, not even the kind made specifically for use in-kiln). As it boils off during firing, glue can actually shift the pieces it’s touching, having the exact opposite of the intended effect, as this Saguaro Cactus failure exemplifies.
In my opinion, the use of glue should be avoided during fusing, and if it absolutely must be used, it should be in the smallest amount possible to minimize the movement created as it evaporates.
A tiny piece of clear confetti I shaped to fit underneath the Saguaro Cactus’s arms and body segment
Though I hadn’t yet learned that glue was probably not aiding this situation, I had learned that sticking a small bit of confetti underneath two pieces of glass can help ensure they don’t separate during firing. That’s the insurance I applied in my setup for the Saguaro Cactus’s second tack-firing, during which it would be fused to the land mass along with the other cacti.
Clear confetti positioned underneath the Saguaro cactus’s body segment, ready for the arms to be placed on top
In preparation for this fuse, I also applied a lesson I’d learned while creating the midground layer in Part 2 of this project: fiber paper is a convenient and efficient way to support any portion of glass you want to ‘float’ in front of the layers behind it.
In this case, I used one layer of 1/8” fiber paper to prop up the overhanging portions of the Prickly Pear, Saguaro, and large Barrel Cacti.
All pieces of the foreground layer in position to be fired together, with fiber paper supporting the overhanging cacti segments
Cuts of fiber paper supporting the overhanging cacti segments, but not quite touching the edge of the land segment
Note that I positioned the fiber paper just a hair’s breadth away from the land mass segment so their edges wouldn’t come into contact while fusing and leave the land with a rough imprint from the paper.
Emphasizing Differences
I wasn’t expecting the Saguaro Cactus to warp around the stringers quite as much as it did, but I was actually pleasantly surprised by the resulting bumpy look. It enhances the rough, prickly texture, and its uniqueness helps to differentiate the foreground layer from the midground layer.
The foreground layer with all cacti fused onto the land, forming a single piece
The Prickly Pear and Saguaro Cacti details, post-firing
The Barrel Cacti details, post-firing
Further differentiating the foreground from the midground are the slight alterations in streakiness and color intensity between the two light brown land segments. Although I used the same light brown opalescent glass sheet for both layers’ land, I used one side of the sheet for the midground, and the other side for the foreground, resulting in minor differences between the two.
Bullseye glass sheets have a unique in “rolled” texture imparted by their manufacturing process.
This texture is often more intense on one side of the glass than the other, as was the case here. I hoped that using alternate sides for the foreground and midground layers would create slight contrast between the two, and really make the foreground ‘pop’ (which it most definitely did!).
The slightly lighter and less mottled land of the foreground layer compared to the land of the midground layer
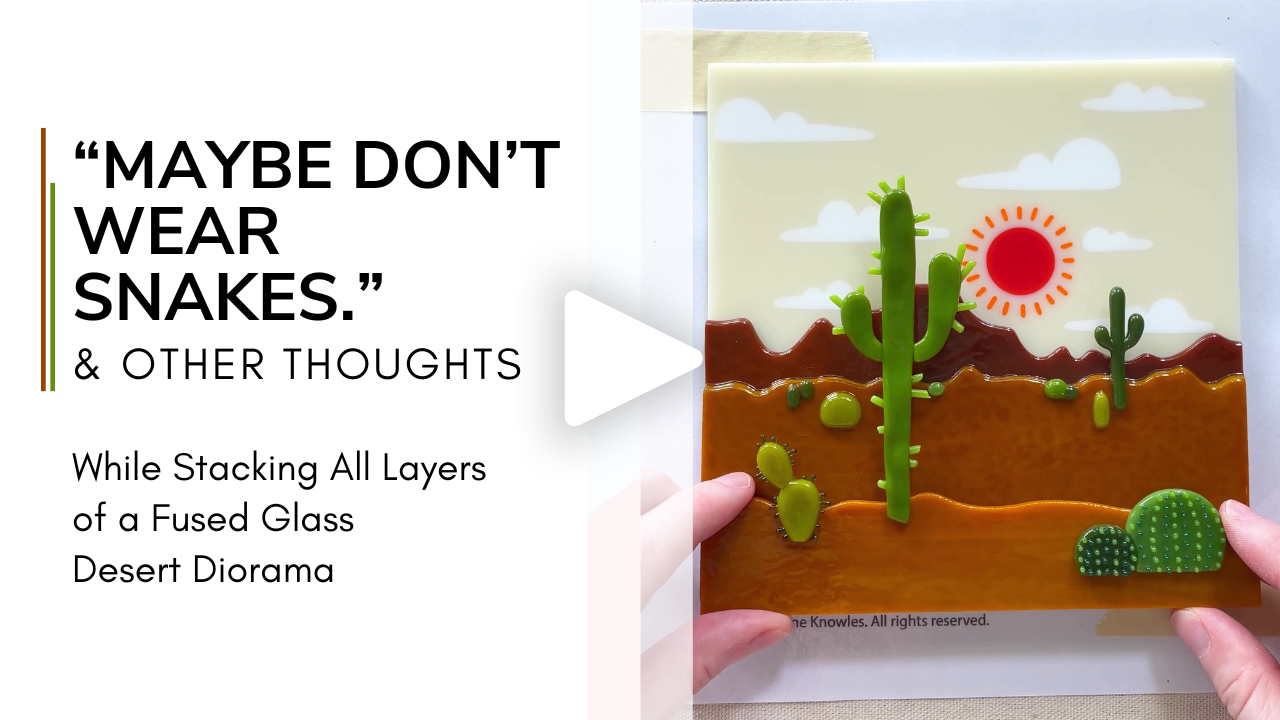
The Full Stack
I was thrilled to finally put all three layers of this piece together and see them play off each other! Photographs don’t quite do it justice, but the progressive softening of the edges from foreground to background builds a beautifully in-depth space that magnetically pulls the viewer in.
The background, midground, and foreground layers stacked atop one another
The background, midground, and foreground layers stacked atop one another, as viewed at an angle so the spacing between layer elements is clearly visible
In the next (and final) part of this project, I’ll add spacers between the various layers that will truly level this piece up from a 3-dimensional scene to a 3-dimensional world, and I’ll cleanly wrap it all up in a boxy frame.
Video Recap
See a short summary of how the foreground layer of this desert diorama was made!
Related Studio Journal Entries

Related Thoughts

A friendly reminder that I share details of my creation processes with the intent of empowering people with knowledge and techniques that may help them reach their full creative potential, not with the intent of enabling other artists to recreate my pieces. All of my designs are protected by copyright and are illegal to reproduce, reuse, or republish without my permission under any circumstances.