
Creating a Fused Glass Desert Diorama, Pt. 1
Unforgettable Terrain
This project was meant as a glass artist’s take on the diorama, which to me, is a window into another place or time—a world within a world. As an ultimate endpoint, I envisioned an entire wall hung with dozens of little diorama boxes, each one depicting a slice of scenery with a story all its own, taking the viewer on a seemingly endless voyeuristic journey.
Of course, I had to test out this idealistic concept with just a single scene.
I based this diorama’s design on the Nevada desert because that landscape is the most otherworldly one I’ve ever personally witnessed.
I took a trip there with my dad several years ago, and our drives through the winding canyons provided some of the most striking imagery I’m sure I’ll ever see. The vivid red rock walls with their sharply jutting plateaus are an immensely powerful presence, especially when juxtaposed with the miles and miles of unblemished flat land surrounding them. Even the flora is awe-inspiring, with many of the cacti towering tens of feet above my head (being born and raised in the northeast, I’d naively always imagined them to be around 6’ at the tallest—which is so wrong!), while others are covered with formidable spikes nearing the length of chopsticks.
All in all, a very appropriate place to create a permanent peek into.
Spacing Things Out
What sets a diorama apart from a painting, or a traditional stained glass panel, or any other flat piece of art, is its depth, which is achieved through a shoebox-like setup with 3D objects placed inside. Recreating such depth poses an obvious challenge for the glass artist, since our go-to medium is thin sheets of glass attached in a 2D manner. However, I wondered whether a look of depth could be achieved by stacking together flat layers of fused glass and spacers?
A rough design sketch of my Desert Diorama construction plan
A wide spacer block I planned to use to create depth between fused glass layers
My idea (as crudely conceptualized in the design sketch above) was to create a three-dimensional desert scene within a thick frame by fusing one layer of glass per scenery distance and following each with a spacer block as follows:
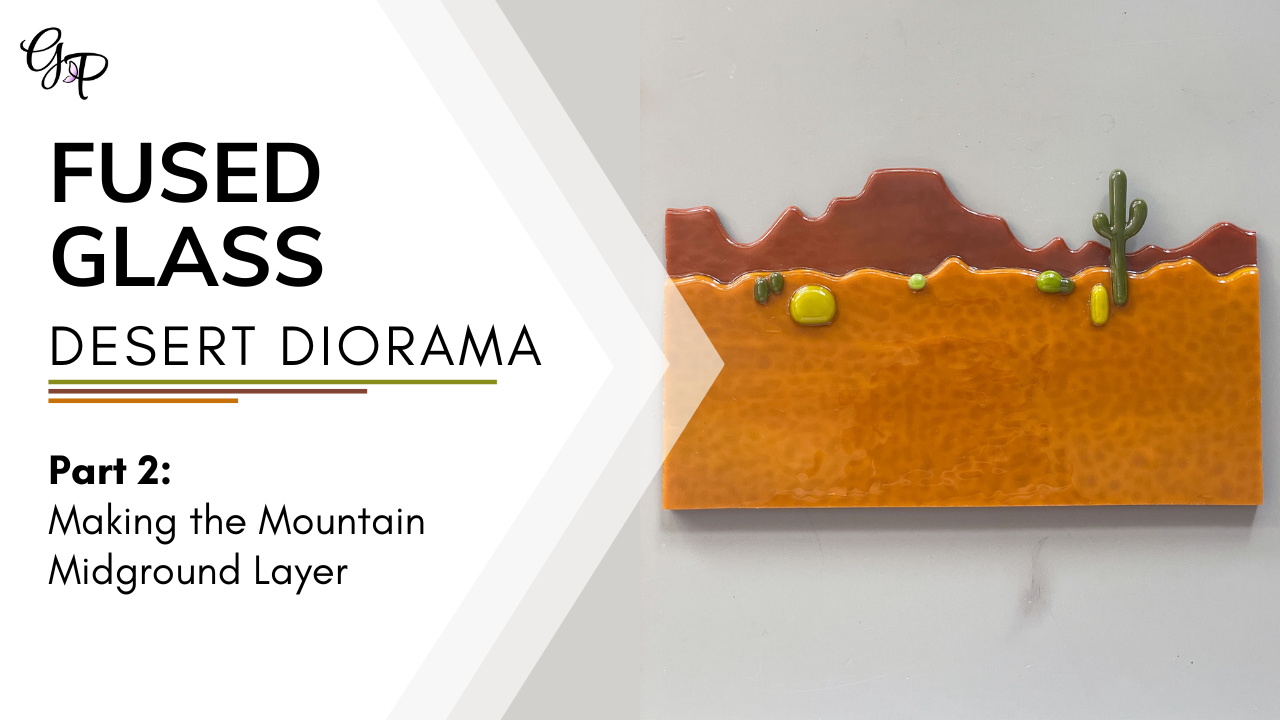
Layer 1: Scenery furthest from the eye (the background layer)
Layer 2: Wide spacer block
Layer 3: Scenery closer to the eye (the midground layer)
Layer 4: Medium spacer block
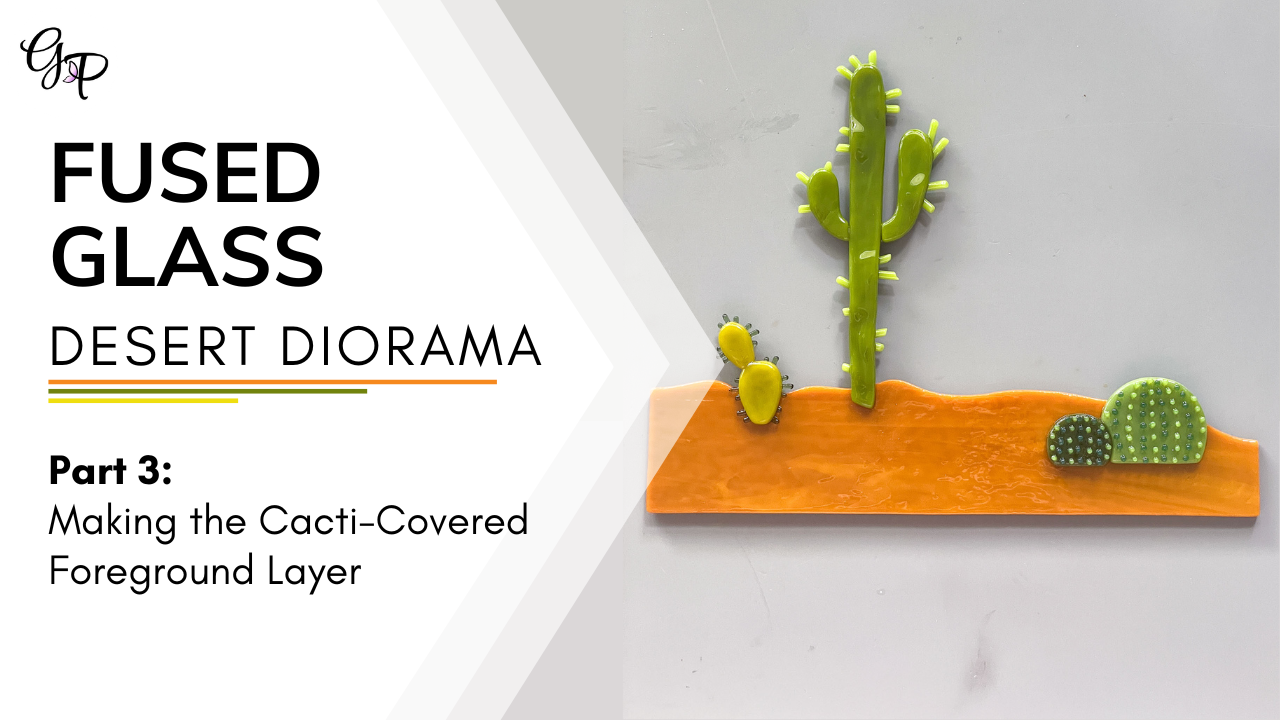
Layer 5: Scenery nearest the eye (the foreground layer)
Layer 6: Thin spacer block
Layer 7: A circular cutout giving a voyeuristic, window-like view into the layers behind
We observe the most detail in the objects closest to us.
As added realism, I planned to mimic this by fusing the background layer at a high temperature to give it the least amount of texture, and the foreground layer at a low temperature to give it the most amount of texture.
Building the Background Layer
Test Run
Background layer test sample with glass segments glued on, pre-firing
As always with new concepts, I made test samples to confirm the glass colors and firing schedules that would be used in the final piece. I constructed this background layer sample with scraps of cream-colored glass (which I planned to use for the sky), white glass (which I planned to use for the clouds), red glass (which I planned to use for the sun), and orange stringers (which I planned to use for the sun rays).
I was specifically looking to answer 3 questions:
How will the color palette look after a full fuse? Certain glasses undergo color shifts at full fuse temperatures, which can be a nasty surprise if unexpected.
How far apart should the sun rays be spaced? At full fuse schedules, stringers can flatten out to ~double their original width, so if they’re placed too close together, they may merge into one another.
Will a typical COE 90 full fuse firing schedule cause all the different glasses used to melt down to the same consistency? Opaque white glass requires a higher temperature/longer max. temperature hold time to fully fuse than most other colors. Since I wanted as little texture in this layer as possible, I wanted to be sure all colors would melt down fully.
As I suspected, even though I used a typical COE 90 full fuse firing schedule, the white glass didn’t soften into the cream glass as much as the other glasses did (as shown by the shallow indents around the sides of the white triangle in the post-fused sample). I increased the schedule’s max. temperature hold time accordingly, and re-fired the sample at this new schedule.
Background layer test sample, post-firing, with the opaque white segment not quite fully fused into the cream base segment
Background layer test sample, post-second-firing, with the opaque white segment fully fused into the cream base segment
Background layer test sample, post-second-firing, with the opaque white segment fully fused into the cream base segment, as viewed at an angle
This amended schedule fused everything down to an even flat surface while not overly rounding out and expanding the shapes.
It also confirmed that leaving ~2mm gaps between stringers resulted in the ideal spacing, and that the colors would work well together (note how the sun scrap and stringer segments appeared to be nearly the same color pre-firing, but the stringers lightened significantly to appear much more orange-y post-firing).
Sky Forming
Empowered with the information gleaned from the test sample, I cut and ground each design element to shape and glued them on to the cream-colored base glass.
Background layer, pre-firing, with shaped clouds and sun glued in place
Background layer, pre-firing, with midground layer pattern template placed on top
Here’s where I hope my design plan becomes more clear. After gluing down the background layer design elements, I placed the midground layer pattern on top to check whether the two layers would line up correctly (which they did). Now, if you imagine that there’s a spacer situated between these two layers so that the midground layer pattern is raised slightly off of the background layer, you’ll understand the three-dimensional effect this project aims to achieve.
Thinking the background layer was good to go, I popped it into the kiln face-down to maintain as much sharpness of shapes as possible (that fact will be important in a minute) for a full fuse.
Unfortunately, it didn’t come out quite as flawless as I’d hoped.
Background layer, post-firing, with the undesirable results of tilted clouds and chaotic sun rays
Closeup of out-of-place sun ray stringer segments, post-firing
The segments of my perfect stringer ring were strewn chaotically! And the topmost two clouds were atilt! I wish I could blame this tragedy on kiln demons, but alas, my own stupidity was at fault.
In my excitement over moving on to the next phase of this novel project, I’d gone right to a full face-down fuse without tack fusing the design elements face-up first.
Typically, this isn’t an incredibly risky strategy, as the weight of the base layer of glass tends to keep the elements below in place as they fuse down, but it becomes dangerous when:
All the design elements are not of the same height. The sun ray stringers were about half the height of the sun middle and clouds, so I suspect that since the sun middle was taller, it began pressing into the cream base layer before the stringers fully adhered, causing them to shift. They may also have just fully fallen off of the base layer as their glue disintegrated, landing slightly out of place.
Design elements are placed very near the edges. The edges tend to condense/expand the most during fusing, creating the most potential for movement, so I suspect that the top clouds ended up shifting since they were very near the base layer edge.
If just a couple stringers had been affected, I may have attempted to carefully grind away the offending segments using a Dremel tool, replace them, and re-fire the piece, but since it was a bunch of stringers and the clouds were also askew, it was too much for me to attempt to salvage.
Sadly, I re-made the piece from scratch (with the key design modification of expanding the perimeter of the layer by .0125” to give the clouds extra buffer from the edge and its potential shifting during fusing).
Background layer second attempt, post-tack-firing
Background layer second attempt, post-tack-firing, as viewed from an angle
With a beautiful tack fuse ensuring all my hard work would stay in place this time, I confidently moved on to the full fuse phase….
…and you may not believe this, but my stupidity struck again!!! (truly, it knows no bounds)
Background layer second attempt, with slightly under-fused clouds forming indents in the cream base segment
Do those indents around the clouds look familiar? I recognized them right away from the initial test sample I fired, where I specifically noted to my stupid-self that this layer would have to be fused at a more intense firing schedule than usual, due to the white glass taking longer to fully melt. I’d accidentally used the wrong full fuse schedule—doi!
My kiln can be programmed to save up to 4 different firing schedules, so I can quickly start it without having to set the temps and times of every single step. Although this is normally a time-saving blessing, it can be a curse if I’m not paying very close attention when I start it up.
The below comparison of the initial background layer attempt to this second attempt shows the marked difference in indentation between the two.
The background layer first attempt (top) as compared to the second attempt, post-initial-firing (bottom)
Fortunately, this mistake didn’t require me to start from scratch, as I was able to simply re-fire the piece at the more intense full fuse schedule I’d used on my test sample.
Ta-da! After grinding the edges to a square, it fit my intended pattern just right.
Completed fully fused background layer, post-firing and post-grinding
Video Recap
Watch a brief summary of how this desert diorama background layer came together!
Related Studio Journal Entries

Related Thoughts
A friendly reminder that I share details of my creation processes with the intent of empowering people with knowledge and techniques that may help them reach their full creative potential, not with the intent of enabling other artists to recreate my pieces. All of my designs are protected by copyright and are illegal to reproduce, reuse, or republish without my permission under any circumstances.